
Do you have an outlet in your home that doesnandrsquo;t seem to work consistently? Does anything you plug into a particular socket fall right back out? These are two common signs that your outlet has worn out and needs to be replaced. Replacing an outlet is easy if you have the right knowledge and toolsandmdash;it takes just a few minutes and replacement parts are just a few dollars at a local hardware store.
Here is a quick step-by-step guide on how to change out an electrical outlet plus a few safety tips to make sure that the task is simple and stress-free.
Shut Off Power to the Outlet Needing Changed
Turn off any and all power that might feed an outlet while youandrsquo;re changing it out. No, we donandrsquo;t mean flipping off the switch that controls that outletandmdash;that leaves risk that someone may accidentally turn the switch on without realizing it and cause injury. Instead, plug a lamp or other light into the outlet youandrsquo;re replacing and turn it on. Then go to your circuit breaker box and shut off the breaker that controls that outlet. When the light shuts off, youandrsquo;ll know youandrsquo;ve found the right one. To be safe, jiggle the plug and turn the lamp on and off a couple times to make sure thereandrsquo;s no response.
Remove the Old Outlet
Using a flat-head screwdriver, loosen the single screw located in the middle of the plastic plate covering your damaged outlet. Next, remove the screw at the top and bottom of the now-exposed outlet and the outlet should pull straight out from the wall.
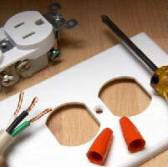
You should notice three different wires connected to the outlet. They are:
- A black or brown “hotandrdquo; wire
- A white “neutralandrdquo; wire
- A green or completely unshielded “groundandrdquo; wire. Be sure to remember what side of your outlet these connections are plugged into.
Depending on the outlet you have installed, you may have to loosen the large screws on the side of your outlet to disconnect these wires. If you have a press-fit outlet, you may have to simply give the wire a stiff pull to get it to pop free. Once your outlet is completely disconnected, throw it away.
Install the New Outlet
Before connecting the wires to your new outlet, take a second to inspect the unshielded copper on each wire. If the copper appears dark, grubby or corroded, cut that portion of the wire off and use a pair of wire strippers to strip off a new length of wire thatandrsquo;s roughly the same as the old segment. This wire should be clean, bright, and corrosion-free, making it safer to use.
If you have a screw terminal on your outlet, bend the new lengths of wire into the shape of a hook and loop it around the appropriate screw (remember how we told you to remember what side the wires were on?). Also, most outlets will have a “+” printed on the “hotandrdquo; wire side and a “-“ printed on the “neutralandrdquo; wire side. Tighten these screws down to secure the wires in place.
If you have a press-fit outlet, locate the hole for each wire and press in the wire. You may have to tighten down a screw to lock the wires in place. Likewise, make sure you connect your ground wire to the appropriate spot, usually located on the bottom of the back of your new outlet.
Carefully slide the outlet in place making sure that no wires are pinched or kinked in the process. Use the screws that came out of your old outlet to tighten down the new one and then replace the faceplate. Then plug your lamp back in and turn the power back on. If the lamp turns on as normal, then youandrsquo;ve done the job correctly and youandrsquo;re good to go! If the lamp still doesnandrsquo;t turn on, check to make sure that the switch is turned on. If it still doesnandrsquo;t turn on, reach out to a professional for a thorough inspectionandmdash;you may have a more serious problem to deal with.
Likewise, if you donandrsquo;t feel comfortable working with electrical equipment, please give us a call to schedule an appointment with our technician. Itandrsquo;s better to have someone trained to work with electricity fix the problem than to try to do so yourself and accidentally cause an issue or even injure yourself from a mistake.
Elsewhere On Our Blog
Elsewhere on our blog this month, we took a look at whether your solar panels will be impacted by winter weather and why your furnace might be blowing nothing but cold air.
Your solar panels provide you with an abundance of clean energy, but only do this when they have a bright supply of sunlight. During winter months, the hours of sunlight diminish greatly and that could impact how much energy they are able to produce. Our blog offered some tips for things you can reasonably expect during winter months and some tips for how to continue to save and keep your energy costs low when the sun isnandrsquo;t out as much.
When it comes to your furnace, there are several reasons why your system could be blowing nothing but cold air. Depending on the type of heating you have, the issue could be anything from a faulty heating element to a faulty electrical connection to a leak in your refrigerant lines. Just make sure you havenandrsquo;t accidentally flipped on your air conditioner by accident first - trust us, it happens!
If you need help with these or any other serious issue with your homeandrsquo;s most important systems, call the experts from Valley Heating, Cooling, Electrical and Solar at (408) 868-5500 now!